背景
春は出会いの季節。来月の帰社日は自己紹介LTをすることに。
こんにちは、ヌマ(writer)です。
会社設立からまだ間もないため、メンバーとの関わりも浅い人がいるのも事実。
もっと自分のことを知ってもらうために、最近ハマっていることや、好きな音楽などを発表する機会を設けられています。
(自己紹介LTの雰囲気など気になる方は広報ブログに記載があります。)
なので、私は「鶏肉のサッパリ煮アプリ」をFlutterで作りました。(?)
目的
人より本気で準備してLTすると面白いだろうという魂胆です。
要件
これがあれば鶏肉のサッパリ煮が作ることができる
- 各材料の分量記載
- できれば増減も
- 煮る時間の計測
非機能要件
- 1人前未満にならないようにする
設計
機能一覧
- 材料の分量の計算をする
- タイマー
使用したもの
- Flutter
- VScode
- Android Studio
環境構築
Flutterの環境構築は簡単なため今回は割愛します。
実装
まずは全体の構成からざっくり下図の感じにします。
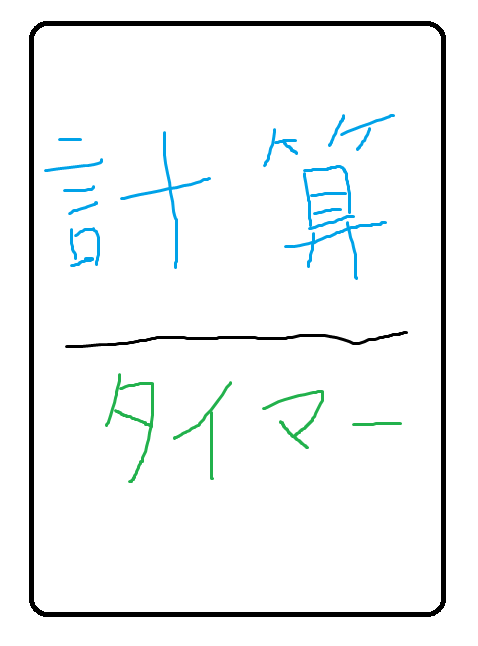
まずは計算のブロックから作成します。
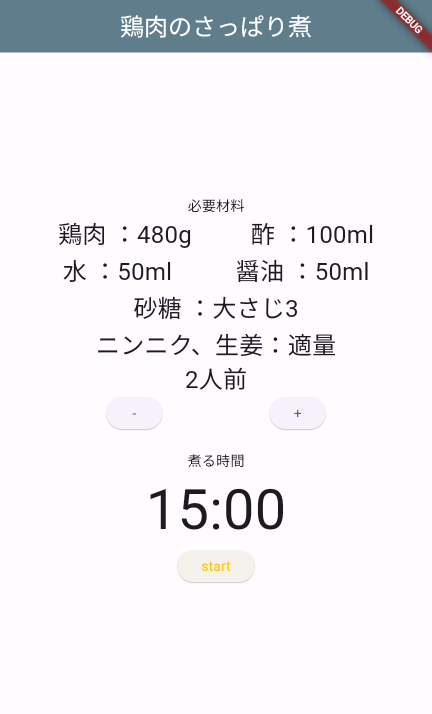
実装はこんな感じになります。
main.dart
      body: SafeArea(
        child:
          Container(

          child: Column(
            mainAxisAlignment: MainAxisAlignment.center,
            children: [
              Text(
                "必要材料"
                ),
              Row(
                mainAxisAlignment: MainAxisAlignment.spaceEvenly,
                children: <Widget>[
                  Text(
                    "鶏肉 :" + foodModel.chiken + "g",
                    style: TextStyle(
                      fontSize: 24,
                    ),
                  ),
                  Text(
                    "酢 :" + foodModel.vinegar + "ml",
                    style: TextStyle(
                      fontSize: 24,
                    ),
                  ),
                ]
              ),
              Row(
                mainAxisAlignment: MainAxisAlignment.spaceEvenly,
                children: <Widget>[
                  Text(
                    "水 :" + foodModel.water + "ml",
                    style: TextStyle(
                      fontSize: 24,
                    ),
                  ),
                  Text(
                    "醤油 :" + foodModel.soysauce + "ml",
                    style: TextStyle(
                      fontSize: 24,
                    ),
                  ),
                ]
              ),
              Text(
                "砂糖 :大さじ" + foodModel.suger,
                style: TextStyle(
                  fontSize: 24,
                ),
              ),
              Text(
                "ニンニク、生姜:適量",
                style: TextStyle(
                  fontSize: 24,
                ),
                  ),
              Text(
                counterModel.count+'人前',
                style: TextStyle(
                  fontSize: 24,
                ),
                ),
              Row(
                mainAxisAlignment: MainAxisAlignment.spaceEvenly,
                children: <Widget>[
                  ElevatedButton(
                    onPressed: () {
                      counterModel.decrease();
                      foodModel.foodvalue(int.parse(counterModel.count));
                      },
                    child: Text("-"),
                  ),
                  ElevatedButton(
                    onPressed: () {
                      counterModel.increase();
                      foodModel.foodvalue(int.parse(counterModel.count));
                    },
                    child: Text("+"),
                  ),
                ]
              ),
この中でfoodModelとcounterModelをclassとして外だししています。
foodModelは材料の分量を持ち、人数分になるように計算するclassです。
ちなみに分量に関しては、ミツカンの米酢の瓶に記載されている分量になります。
foodMode.dart
class FoodModel extends ChangeNotifier {
  String vinegar = "100";
  String soysauce = "50";
  String water = "50";
  String suger = "3";
  String chiken = "480";
  int _vinegar = 50;
  int _soysauce = 25;
  int _water = 25;
  double _suger = 1.5;
  int _chiken = 240;
  foodModel() {
    init();
    _refresh();
  }

  void init(){
    _vinegar = 50;
    _soysauce = 25;
    _water = 25;
    _suger = 1.5;
    _chiken = 240;
  }

  void _refresh() {
    String strDigits(int n) => n.toString();
    String strDigitss(double n) => n.toString();
    vinegar = strDigits(_vinegar);
    soysauce = strDigits(_soysauce);
    water = strDigits(_water);
    suger = strDigitss(_suger);
    chiken = strDigits(_chiken);
    notifyListeners();
  }

  void foodvalue(int counts) {
    init();
    _vinegar = _vinegar * counts;
    _soysauce = _soysauce * counts;
    _water = _water * counts;
    _suger = _suger * counts;
    _chiken = _chiken * counts;
    _refresh();
  }
}
counterModelは人数を増減させるときに利用します。
ここでのポイントは1人前以下の分量で調理することはないので、counterを1未満にしないようにすることになります。
counterModel.dart
class CounterModel extends ChangeNotifier {
  int _counter = 2;
  String count = "2";
  counterModel() {
    _refresh();
  }

  void _refresh() {
    String strDigits(int n) => n.toString();
    count = strDigits(_counter);
    notifyListeners();
  }

  void increase() {
    _counter++;
    _refresh();
  }

  void decrease() {
    if (_counter < 2) {
      _refresh();
    } else {
    _counter--;
    _refresh();
    }
  }

  void doReset() {
    _counter = 1;
    _refresh();
    notifyListeners();
  }
}
続いて実装イメージのタイマーの部分になります。
タイマーの部分の実装は以下のようになります。
main.dart
Text(
                "煮る時間"
                ),
              Text(
                timerModel.minutes + ':' + timerModel.seconds,
                style: TextStyle(
                  fontSize: 56,
                ),
              ),
              ElevatedButton(
                onPressed: () {
                  timerModel.doStartOrReset();
                },
                child: Text(timerModel.buttonDisplay),
                style: ElevatedButton.styleFrom(
                  foregroundColor: timerModel.foregroundColor,
                  backgroundColor: timerModel.backgroundColor,
                ),
              )
こちらは結構簡単になりました。
ここで利用しているtimerModelは以下になります。
timerModel.dart
class TimerModel extends ChangeNotifier {
  Timer? timer;
  Duration timerDuration = Duration(minutes: 15);
  String minutes = "00";
  String seconds = "00";

  bool isDisabledButton = false;
  String buttonDisplay = "start";
  Color foregroundColor = Color.fromARGB(255, 255, 199, 0);
  Color backgroundColor = Color.fromARGB(255, 253, 251, 240);

  TimerModel() {
    _refresh();
  }

  void _refresh() {
    String strDigits(int n) => n.toString().padLeft(2, '0');
    minutes = strDigits(timerDuration.inMinutes.remainder(60));
    seconds = strDigits(timerDuration.inSeconds.remainder(60));
    notifyListeners();
  }

  void setCountDown() {
    final reduceSecondsBy = 1;
    final seconds = timerDuration.inSeconds - reduceSecondsBy;
    if (seconds < 0) {
      timer!.cancel();
    } else {
      timerDuration = Duration(seconds: seconds);
    }
  }

  void start() {
    timer = Timer.periodic(Duration(seconds: 1), (_) {
      setCountDown();
      isDisabledButton = false;
      _refresh();
    });
  }

  void reset() {
    timer!.cancel();
    timerDuration = Duration(minutes: 15);
    isDisabledButton = false;
    _refresh();
  }

  void doStartOrReset() {
    // 連続して押下することを回避
    if (isDisabledButton) {
      return;
    }
    isDisabledButton = true;
    if (timerDuration == Duration(minutes: 15)) {
      start();
      buttonDisplay = "Reset";
      foregroundColor = Color.fromARGB(255, 113, 113, 113);
      backgroundColor = Color.fromARGB(255, 253, 251, 240);
    } else {
      reset();
      buttonDisplay = "Start";
      foregroundColor = Color.fromARGB(255, 255, 199, 0);
      backgroundColor = Color.fromARGB(255, 253, 251, 240);
    }
    notifyListeners();
  }
}
煮る時間は15分で計算しています。
人数が増えると分量増えるのに煮る時間は増えないのかという意見があると思いますが、時間は目安なのでうまいこと調整できるのが「料理人」ということだと私は思います。
上記で実際に動かしてみるとこんな感じになります。
個人でしか使わないアプリだったので拾い画像を背景を入れていたのですが、今回ブログに載せるにあたり、背景を削除しました。
まとめ(感想)
今回Flutterを使ってアプリを作成しましたが、自分で作成したアプリが自分のスマホで動いていることを見てすごく感動しました。
いつもバックエンドやAWSのインフラ周りを触っているのでフロントエンドがより楽しく感じます。
Flutterのコツは最初に画面構成をどのようにするかを図示することと、コードとそれを見比べることが大事だと感じました。